引言
上次课内容: C程序(指令序列)如何执行
- 如何在模拟器上执行
- YEMU基本原理: 用C语言实现ISA状态机(\(S = {<R, M>}\))
- 如何在电路上执行
- YPC基本原理: 用数字电路实现ISA状态机(\(S = {<R, M>}\))
- Verilator基本原理: 用C语言实现数字电路状态机
实现更多指令, 就能得到一个功能更完整的模拟器/处理器
本次课内容: NEMU(加强版YEMU)代码导读
- 项目构建
- 代码选讲
- 配置系统
make项目构建
make工具
The make utility will determine automatically which pieces of a large program need
to be recompiled, and issue the commands to recompile them...

To prepare to use make, you must write a file called the makefile that describes
the relationships among files in your program, and the states the commands for
updating each file...

...The make program uses the makefile description and the last-modification times
of the files to decide which of the files need to be updated.
RTFM就可以了解make工具的基本功能和原理:
- 通过一个叫
makefile的文件来描述程序各种文件之间的依赖关系 - make工具根据这些依赖关系和上次修改时间来决定哪些文件需要更新
- 执行
makefile中相应的命令来更新这些文件
一个简单的例子
可以输出make工具的调试日志
也可以通过strace了解make工具的行为
stat系统调用可以查询文件信息
YEMU v2.0中的Makefile
# 变量
BIN = yemu
USER_BIN = hello.bin
RV_CFLAGS = -march=rv32g -mabi=ilp32 -ffreestanding -nostdlib -static -Wl,-Ttext=0x0 -O2

SRCS = $(shell ls *.c)  # 将shell命令的运行结果赋值给变量
OBJS = $(SRCS:.c=.o)    # 字符串处理, SRCS变量中的.c替换成.o
CC   = gcc

# 规则
prog/hello.elf: prog/hello.c
    riscv64-linux-gnu-gcc $(RV_CFLAGS) -o $@ $^  # 自动变量

$(USER_BIN): prog/hello.elf
    riscv64-linux-gnu-objcopy -j .text -O binary $^ $@

$(BIN): $(OBJS)  # 隐含规则

run-yemu: $(BIN) $(USER_BIN)  # 此规则并不生成目标run-yemu
    ./$(BIN) $(USER_BIN)

.PHONY: run-yemu clean   # 定义伪目标
clean:  # 用于清除编译结果
    -@rm $(OBJS) $(BIN) prog/hello.elf $(USER_BIN) 2> /dev/null
一些说明
变量 = C语言中的宏定义
- 引用变量 = 字符串替换
- 字符串处理函数
subst,shell等
规则中也可以引用变量
- 自动变量: 具体取值与规则相关
$@- 规则的目标,$^- 规则的依赖
- 自动变量: 具体取值与规则相关
隐含规则: make可以自动推导一些常见的编译规则, 如
- 可以结合
strace和调试日志理解这一行为
- 可以结合
伪目标: 相应的规则不检查依赖关系, 总是执行规则的命令
更多细节: 《跟我一起写Makefile》(入门), 《GNU Make Manual》(精通)
NEMU中的Makefile
更复杂了…
- 好几个
mk文件- 还互相包含
- 非常多变量
- 很多新的编译选项
- 很多没见过的函数
wildcard,patsubst,filter-out…
- 还有类似条件编译的语法
ifeq ... endif
- 不知道有没有其他隐含规则
应该如何下手?
回顾: 了解程序/工具行为的两种方法
- 看源码(source): 可以得知每一处静态细节, 但较繁琐
- 看踪迹(trace): 容易了解运行动态行为, 但不全面
下手需要选择容易的方式: 看踪迹
踪迹也有不同的层次:
strace- 系统调用踪迹, 查看程序/工具如何与操作系统交互make -d- make工具的调试日志, 查看make如何进行决策?- 面向上层用户的日志, 只想了解make执行哪些命令来编译NEMU
RTFM: man make, 搜索command关键字
可以找到两个相关的选项
-n: 只打印命令但不执行(更合适)--trace: 输出目标被构建的原因和执行的命令
开放讨论: 如何RTFM
有同学反馈man make中的内容很多, 一打开就不想读
一个普遍的误区: 读手册 = 读完整本手册
- Intel x86的手册有几千页, 显然并不是每次读x86手册都全部读完
实际中的RTFM: 在FM中快速定位感兴趣的信息
- 本质上是发挥大家的信息检索能力
例如, man make中有30个选项
- 只要阅读每个选项中的第一句话, 就能快速判断这个选项是否相关
- 读一句话花5s -> 了解30个选项只需花150s, 2.5min
- 配合关键字搜索, 只需要了解不到10个选项
- 只需要1min, 即可找到相关的选项
观察make执行的命令
输出了好多信息, 在vim中稍作处理提升可读性
# 只保留gcc或g++开头的行
:%!grep "^\(gcc\|g++\)"

# 将环境变量$NEMU_HOME所指示字符串替换为$NEMU_HOME
:%!sed -e "s+$NEMU_HOME+\$NEMU_HOME+g"

# 将$NEMU_HOME/build/obj-riscv32-nemu-interpreter替换为$OBJ_DIR
:%s+\$NEMU_HOME/build/obj-riscv32-nemu-interpreter+$OBJ_DIR+g

# 将-c之前的内容替换为$CFLAGS
:%s/-O2.*=riscv32/$CFLAGS/g

# 将最后一行的空格替换成换行并缩进两格
:$s/  */\r  /g
和编译YEMU很类似, 但多了一些编译和链接选项(老规矩: RTFM)
回过头来看Makefile
大致理解了make的行为, 就可以回过头来(连蒙带猜地)看Makefile了
nemu/MakefileSRCS: 和YEMU差不多, 是需要编译的源文件CFLAGS: 刚才看到的编译选项include $(NEMU_HOME)/scripts/native.mk: 包含其他文件
nemu/scripts/native.mk- 一些用于运行和清除编译结果的伪目标
nemu/scripts/build.mk- 编译规则
- 包含源文件与头文件的依赖关系(由gcc的
-MMD选项生成, 并通过fixdep工具处理)
NEMU的初始化
NEMU: 加强版YEMU
来看看项目规模
find . -name "*.[ch]" | grep -E "^\./(src|include)" | \
  grep -E -v "^\./include/config" | grep -v "mips32\|riscv64\|loongarch32r" | wc
find . -name "*.[ch]" | grep -E "^\./(src|include)" | \
  grep -E -v "^\./include/config" | grep -v "mips32\|riscv64\|loongarch32r" | xargs wc
和NEMU直接相关的源文件: 50+个, 3500+行
- 对大部分同学来说, 可能是第一次接触这么大的项目
其实项目规模很小, QEMU有25000+个源文件, 110000+行源代码 😂
不管三七二十一, 先运行一下再说
框架代码有一个练习用的assert(0),
完成练习之后可成功运行
$ make run
+ LD /home/ysyx/nemu/build/riscv32-nemu-interpreter
/home/ysyx/nemu/build/riscv32-nemu-interpreter --log=/home/ysyx/nemu/build/nemu-log.t
xt
[src/utils/log.c:28 init_log] Log is written to /home/ysyx/nemu/build/nemu-log.txt
[src/memory/paddr.c:56 init_mem] physical memory area [0x80000000, 0x87ffffff]
[src/monitor/monitor.c:51 load_img] No image is given. Use the default build-in image
.
[src/monitor/monitor.c:28 welcome] Trace: ON
[src/monitor/monitor.c:29 welcome] If trace is enabled, a log file will be generated
to record the trace. This may lead to a large log file. If it is not necessary, you
can disable it in menuconfig
[src/monitor/monitor.c:32 welcome] Build time: 14:35:42, Sep  9 2023
Welcome to riscv32-NEMU!
For help, type "help"
[src/monitor/monitor.c:35 welcome] Exercise: Please remove me in the source code and
compile NEMU again.
(nemu) c
[src/cpu/cpu-exec.c:120 cpu_exec] nemu: HIT GOOD TRAP at pc = 0x8000000c
[src/cpu/cpu-exec.c:88 statistic] host time spent = 95 us
[src/cpu/cpu-exec.c:89 statistic] total guest instructions = 4
[src/cpu/cpu-exec.c:90 statistic] simulation frequency = 42,105 inst/s
(nemu) q
仔细看程序的输出
发现log/trace等关键字
- 还有日志文件, 当然要看一下(从运行时动态行为了解NEMU)
[src/utils/log.c:28 init_log] Log is written to /home/ysyx/nemu/build/nemu-log.txt
[src/memory/paddr.c:56 init_mem] physical memory area [0x80000000, 0x87ffffff]
[src/monitor/monitor.c:51 load_img] No image is given. Use the default build-in image
.
[src/monitor/monitor.c:28 welcome] Trace: ON
[src/monitor/monitor.c:29 welcome] If trace is enabled, a log file will be generated
to record the trace. This may lead to a large log file. If it is not necessary, you
can disable it in menuconfig
[src/monitor/monitor.c:32 welcome] Build time: 14:35:42, Sep  9 2023
[src/monitor/monitor.c:35 welcome] Exercise: Please remove me in the source code and
compile NEMU again.
0x80000000: 80 00 02 b7 lui     t0, 524288
0x80000004: 00 02 a0 23 sw      zero, 0(t0)
0x80000008: 00 02 a5 03 lw      a0, 0(t0)
0x8000000c: 00 10 00 73 ebreak
[src/cpu/cpu-exec.c:120 cpu_exec] nemu: HIT GOOD TRAP at pc = 0x8000000c
[src/cpu/cpu-exec.c:88 statistic] host time spent = 95 us
[src/cpu/cpu-exec.c:89 statistic] total guest instructions = 4
[src/cpu/cpu-exec.c:90 statistic] simulation frequency = 42,105 inst/s
只是多打印了几条指令, 但可以看出: 本质上和YEMU一样在执行指令!
开始RTFSC
大致了解NEMU的动态行为后, 就可以来阅读代码了
- 从哪里开始?
- NEMU在Linux宿主环境上运行:
当然是从
main()函数开始啦
- NEMU在Linux宿主环境上运行:
当然是从
下一个问题: main()函数在哪里呢?
- RTFSC方法: 发现
nemu/src/nemu-main.c, 直觉告诉你在里面 - IDE方法: 导入工程后, 使用IDE的查找功能 / vim + ctags
- Unix方法:
grep -nr "\bmain\b" nemu/src
状态机模型的启发: 使用GDB来RTFSC
源代码是静态的, 状态机是动态的: 结合程序运行的行为更容易理解
- 通过TUI(Text User Interface)在GDB中打开一个源码窗口
一些常用的GDB命令(更多的命令RTFM)
r- 重新开始执行程序s- 单步执行一行源代码 /n- 类似但不进入函数(可用于跳过库函数)finish- 执行直到当前函数返回p- 打印变量或寄存器的值x- 扫描内存bt- 查看调用栈b- 设置断点 /watch- 设置监视点help xxx- 查看xxx命令的帮助
初始化 - parse_args()
通过init_monitor初始化NEMU的大部分功能
parse_args() - 解析参数
- 调用了专门用于解析参数的库函数
getopt_long()man getopt_long, 还赠送了一个示例
- 成功识别了给NEMU输入的
--log参数- NEMU也是一个命令行工具
init_rand() - 初始化随机数
init_log()
init_log() - 打开日志文件
Assert()宏和YEMU中介绍的类似Log()宏与printf()类似, 但进行了如下增强:- 可以输出当前位置
__FILE__/__LINE__/__func__- C语言提供的预定义宏__func__其实是个预定义的变量
- 可以输出颜色
- ANSI escape
code(
man console_codes)
- ANSI escape
code(
- 还可以自动换行
不换行可能无法及时输出到终端, RTFM:
man setbuf
- 可以输出当前位置
init_mem()和init_isa()
init_mem() - 初始化状态机的\(M\)
- 将\(M\)中内容设置为随机数
- 可以暴露访问未初始化内存的Undefined Behavior
init_isa() - 设置状态机的初始状态
- \(M\)中存放程序 -
通过
memcpy()往\(M\)中拷贝一段内置程序 cpu.pc = RESET_VECTOR, 该值可通过menuconfig配置, 默认为0x80000000cpu.gpr[0] = 0, 0号寄存器恒为0
剩余初始化步骤
load_img() - 加载命令行指定的镜像文件
- 类似YEMU从文件中读入prog.bin
- 但目前NEMU命令行未给出镜像文件, 因此跳过该过程
- \(M\)中仍然是内置程序
init_difftest() - DiffTest测试相关, 目前未开启,
可忽略
init_sdb() - 初始化SDB
- SDB = 简化版GDB
- 你在PA1中需要实现它
init_disasm() - 初始化LLVM提供的用于反汇编的库函数
welcome() - 输出欢迎信息
- 以及trace的状态信息
- 还输出了编译的时间和日期
回到main()
engine_start() -> sdb_mainloop()
- 其中会输出命令提示符, 提示用户输出SDB的命令
- 这部分代码的阅读都是C语言和字符串处理, 就作为课后练习吧!
NEMU指令执行选讲
执行指令
在NEMU中输入c命令, 将会开始执行程序
cpu_exec() -> execute() ->
exec_once() -> isa_exec_once()
核心功能与YEMU的inst_cycle()非常类似
阅读decode_exec()
NEMU为大家准备了一个 “抄手册宏”
用它来实现指令, 真的只需要抄手册就可以了 😂
- 不言自明 - 虽然还不是很清楚背后的黑科技, 但也能猜到大致行为
- 不言自证 - 无脑抄, 只要没抄错, 基本上是对的
但这些宏的展开过程并不那么好读 😂
解密黑科技 - 土办法
用笔在纸上推导一下展开过程, 人肉宏展开
- 脑科学研究表明: 人脑的短期记忆容量是有限的(7±2个单元)
- 看到一半就溢出了
- 用笔写下展开过程是很奏效的(把短期记忆永久存储到纸上)
- 推过一遍就能理解
- 瞪眼半小时, 还不如动笔3分钟
解密黑科技 - 现代方法
使用工具查看宏展开结果
回顾: 使用gcc的-E参数可以输出预处理结果
- 但直接编译会报错: 找不到头文件
解决方案: 在Makefile文件的编译规则中添加命令
一些有趣的宏
pattern_decode()采用循环展开而不是for循环来从字符串中计算出key,mask和shift属性- 输入都是常量, 在一定优化等级下编译器可将计算过程全部优化掉
- 调用时传递
STRLEN(pattern)而不是strlen(pattern)
nemu/include/macro.h
IFDEF/IFNDEF- 可以替代#ifdef/#ifndef, 写出更紧凑的代码MAP(c, f)- 类似X-macroBITS(x, hi, lo)- 类似Verilog的x[hi:lo]SEXT(x, len)- 借助struct和位域进行符号扩展
建议手动展开来体会它们的诀窍
历代NEMU的指令实现方案
| 年份 | 指令实现方案 | 不言自明 | 不言自证 |
|---|---|---|---|
| 2014 | Copy-Paste(反面教材😂) | ✖️✖️✖️ | ✖️✖️✖️ |
| 2015~2016 | 函数定义宏 + include | ✖️ | ✖️ |
| 2017~2019 | 填表宏 + IR | ✔️ | ✔️ |
| 2020 | 填switch宏 + IR | ✔️ | ✔️ |
| 2021 | 抄手册宏 + IR | ✔️✔️ | ✔️✔️ |
| 2022~2023 | 抄手册宏 | ✔️✔️✔️ | ✔️✔️✔️ |
准则: 越接近手册, 不言自明和不言自证就做得越好
- 一看代码就能联想到手册
- 很容易检查实现和手册是否一致
开放讨论: 为什么要用宏这么复杂?
译码的例子说明了编码和维护之间存在一定的矛盾
- 采用容易理解的方式编码, 可能会使得代码难以维护
- Copy-Paste很好理解
- 要采用容易维护的编码方式, 就需要采用更多的高级功能对重复代码进行抽象
- 抄手册宏, Chisel
初学者比较容易感知的是编码的复杂度, 但对代码的可维护性感知较弱
- 需要在调试的过程中吸取教训
- 如果你不信, 可以试试采用Copy-Paste方式实现译码
- 一个原则: 编码的开销是一次性的, 但你将来还需要不断维护这份代码
- 对有一定规模的项目来说, 可维护的代码比容易理解的代码更重要
- 可以通过注释辅助理解代码
- 对有一定规模的项目来说, 可维护的代码比容易理解的代码更重要
menuconfig配置系统
kconfig: 一套配置描述语言
宏定义多起来之后, 维护不方便
- 尤其是有依赖关系的宏
- 例如定义宏A后, 宏B必须是某个值, 宏C不能取某个范围
- 交给开发者来维护容易出错: 忘了修改关联的宏 = bug = 调试
交给专业的工具来维护
- 开发者用kconfig语言来编写配置描述文件(如
nemu/Kconfig)- 配置选项的属性, 包括类型, 默认值等
- 不同配置选项之间的依赖关系(显式写出来)
- 配置选项的层次关系
- 开发者提供一部分满足依赖关系的配置选项,
kconfig编译器根据配置描述文件编译出宏定义代码
- 未提供的配置选项将取默认值
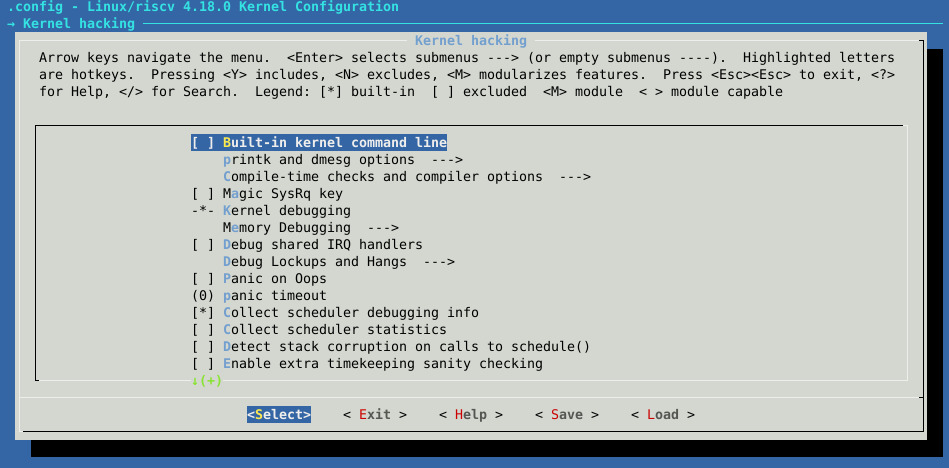
menuconfig - 让 “选择”配置选项更容易
但 “提供一部分满足依赖关系的配置选项”并不容易, 修改也不容易
menuconfig: 读取配置描述文件, 以菜单树的形式展示各种配置选项
- 开发者完成选择后, menuconfig保存选择结果
- 如
nemu/.config, 是个隐藏文件
- 如
- kconfig根据选择结果和配置描述文件进行编译

kconfig与C代码和Makefile的协助
kconfig编译后生成如下文件:
- 可以被包含到C代码中的宏定义(
nemu/include/generated/autoconf.h)- 这些宏的名称皆形如
CONFIG_xxx
- 这些宏的名称皆形如
- 可以被包含到Makefile中的变量定义(
nemu/include/config/auto.conf) - 可以被包含到Makefile中的,
和配置描述文件相关的依赖规则(
nemu/include/config/auto.conf.cmd) - 通过时间戳来维护配置选项变化的目录树
nemu/include/config/- 配合另一个工具
nemu/tools/fixdep来使用, 用于在更新配置选项后节省不必要的文件编译
- 配合另一个工具
例1 - Makefile中的filelist
需求: menuconfig的某些配置选项会决定某些源文件是否参与编译
- NEMU在Makefile中采用文件列表来汇总需要编译的文件
SRCS-y- 参与编译的源文件的候选集合SRCS-BLACKLIST-y- 不参与编译的源文件的黑名单集合DIRS-y- 参与编译的目录集合, 该目录下的所有文件都会被加入到SRCS-y中DIRS-BLACKLIST-y- 不参与编译的目录集合, 该目录下的所有文件都会被加入到SRCS-BLACKLIST-y中
- 需要编译的文件集合 = 候选集合 - 黑名单集合
与kconfig协助
例2 - fixdep
nemu/include/generated/autoconf.h集合了所有由kconfig生成的宏定义
- 每个文件都可能会使用, 干脆包含到
common.h里面吧- 每个文件都会直接/间接包含
common.h
- 每个文件都会直接/间接包含
- 但只要在menuconfig修改任意一个选项, 都会导致所有文件重新编译
fixdep: 一个聪明的小工具
- 通过分析文件中的
CONFIG_xxx宏, 将对autoconf.h的依赖分解成对若干空文件的依赖 - kconfig更新配置选项时, 更新相应空文件的时间戳
一个例子: 修改Testing and Debugging -> Only trace instructions when the condition is true
总结
读代码 != “读”代码
读代码的最终目的是理解程序
- 看源码(source): 可以得知每一处静态细节, 但较繁琐
- 看踪迹(trace): 容易了解运行动态行为, 但不全面
先从容易理解的方式下手(trace), 再结合程序的动态行为理解静态代码
make -n-> Makefile- 运行NEMU -> GDB -> NEMU代码
使用正确的工具提升工作效率
- 处理
make -n的信息方便理解 - GDB的TUI
- 查看宏展开结果/代码对齐
- kconfig/menuconfig/fixdep


